Use clip masks
A clip mask is a layer that floats above an object, allowing you to adjust the transparency of specific areas without permanently modifying the underlying content. You can create a clip mask to reveal parts of the image through the editable area, while the surrounding masked area remains protected from changes. For example, you can create a clip mask from the subject of an image, hiding the background while keeping the subject fully transparent. Alternatively, you can create a clip mask that hides the editable area, gradually revealing only portions of the image outside it. You can also convert an object's transparency into a clip mask, so you can modify or remove the effect.
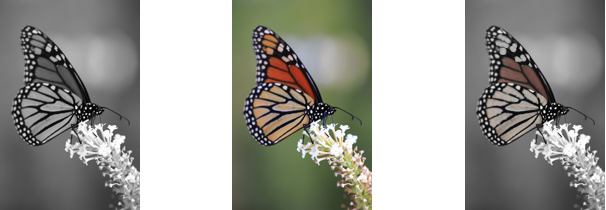
The grayscale object (left) was stacked over the colored object (center), and a clip mask was created from the grayscale object (left). With the clip mask selected, the Paint tool was used to reveal the color in the butterfly’s wings (right).
In addition, you can conditionally remove an unwanted part of an object by defining an editable area to create a clip mask. For more information about editable areas, see Define editable areas.
If you are satisfied with the clip mask results, you can apply the change to the object permanently by combining the clip mask with the object.
You can modify the size of a clip mask after you’ve created it. You can also adjust the transparency of a clip mask to control the extent to which pixels in the image are visible.
You can also disable a clip mask to reveal the object, while preserving the clip mask, or delete a clip mask.
You can also apply a clip mask to an object group.
You can use a clip mask to define an editable area. For more information, see To define an editable area by using a clip mask.
To modify the transparency of an object or object group by using a clip mask
You can change only the active clip mask.
You can also create a clip mask that reveals the entire object or object group from the Objects docker by clicking the Create clip mask button ![]() .
.
When you apply a clip mask to an object group, you can modify the view of individual objects in the clipped mask area by selecting them in the Objects docker and moving them around.
To create a clip mask from an object transparency
To create a clip mask from an editable area or the image subject
You can also create a clip mask that reveals the entire object or object group from the Objects docker by clicking the Create clip mask button ![]() .
.
To combine a clip mask with an object or object group
To disable a clip mask
To modify a clip mask
To highlight the clip mask in context of the rest of the image, you can display a red-tinted transparent overlay by right-clicking a clip mask in the Objects docker and clicking Paint On Clip Mask In Context. If you adjust the transparency of a clip mask in certain areas, the degree of red displayed by the overlay in those areas varies accordingly.